
Over the past few weeks, I’ve been covering some of the basics of baking homemade bread… I know that it can be intimidating to a lot of people, so I am doing my best to take away the fear and frustration!
So far, in my bread baking series, I’ve covered the basic equipment needed (not bread machines and mixers… I really do mean basic!) and the different types of yeast (and we learned that yeast is not a bad word). We’ve covered a lot of the “background information” but now it’s time to get our hands dirty a bit… Well, not too dirty!
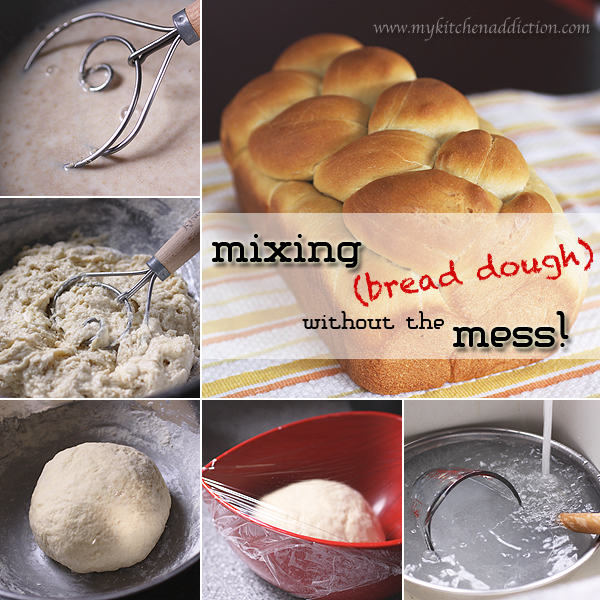
Week 3 – Mixing Without the Mess
I have to admit that one of the things that kept me away from baking homemade bread at home was the mess… While I love to cook and bake, I do not love to scrub counter tops and wash dishes. I know very few people who do!
Fortunately, I’m here to tell you that you can make homemade bread (by hand, even!) without making a bit mess. In all of my bread baking, I have learned how to contain the mess and avoid an afternoon of cleaning my kitchen every time I bake bread. So, today I am going to share what works for me!

My One-Bowl Method…
For me, the messiest part of baking bread was always dealing with the mess that resulted from kneading bread on a “lightly floured surface”… I would sprinkle flour all over the granite counter top on the island in my kitchen, and then I would proceed to knead my bread dough. Sounds reasonable enough, doesn’t it?
The thing is, the flour was never contained to just the surface on which I was kneading. I would have flour on the floor, on my clothes, on the dog (it is dangerous to stand right by my feet while I’m baking!)… You get the picture. In addition to the thin layer of flour that would be covering my entire kitchen, I would also end up with a big sticky mess of dough on my counter top. No fun.
I was about to give up on making bread entirely when I realized that I could simply knead the dough in the large mixing bowl used to mix the dough. It is a simple idea, but it took me a while to figure it out! All of that flour will stay right in the bowl, and you won’t have to chase the dog around the house trying to make sure you wiped all of the flour off of her nose.
An Excuse to Leave the Dishes in the Sink!
Here’s another trick for easy cleanup after you’ve been mixing up bread dough… Don’t do the dishes right away!
If it didn’t make a difference, I wouldn’t be telling you to leave dishes in the sink. Normally, I have to clean up my dishes as I work in the kitchen. I cannot relax knowing that I have a sink full of dishes waiting to be washed… It’s like a dark cloud hanging over my head. When it comes to cleaning out my bread dough mixing bowl, though, a nice soak eliminates a lot of scrubbing.
Want to know the most important part? Soak all of your sticky dough covered bowls and utensils in COLD water! I know, you’re probably not used to using cold water when it comes to doing the dishes… I wasn’t either. But, when it comes to flour in your mixing bowl, hot water will actually cook the flour and make it stick to the sides of your bowl (this has probably happened to you before, no?). Then, the dough gets caked to the side of the bowl, and it’s difficult to get off.
Instead, fill your mixing bowl with nice cool water and let it sit for a while. You’ll be able to rinse all of the sticky dough off without scrubbing a bit. I’m serious.
From Start to Finish…
Now that we’ve covered two important tips for minimizing the mess when you’re mixing up your bread dough, I think it’s time to go through play-by-play of each step required to mix up bread dough. The order matters, and you won’t find all of these steps in your bread recipes, so pay attention!
- Grease the bowl that you will be letting your bread dough rise in FIRST. You’ll thank me later when you need to transfer the dough to a lightly greased bowl and your hands are covered with flour.
- Combine your lukewarm liquid with the yeast and dissolve. Gradually add the other ingredients in your recipe and work in the flour until the dough begins to pull away from the sides of the bowl.
- Continue adding flour as you knead the bread in the same bowl.
- Once the dough is smooth and does not stick to your hands (refer to the recipe regarding how long to knead and approximately how much flour is required), transfer the dough to the greased bowl (step 1)… Thank me for telling you to grease the bowl first.
- Cover the greased bowl with plastic wrap and set the dough aside to rise.
- Place the all of your dirty utensils and measuring cups in the mixing bowl. Place the bowl in the sink and fill it with COLD water. Walk away.
- Once the dough has risen, shape it according to the recipe you’re following, and transfer it to a bread pan, baking sheet, etc.
- Now, go ahead and wash the original mixing bowl and utensils along with the bowl the dough rose in. By waiting until the dough is done rising, you only have to do the dishes once!
- Bake your bread and enjoy the fact that you don’t have to scrub your kitchen!
Next Week… It’s Time to Bake!
Now that we’ve covered the basics of bread baking, you’re ready to start baking homemade bread. Don’t worry, though, I won’t leave you to fend for yourself! Next week, I’ll be sharing a simple recipe for homemade bread, and we’ll bake it together, step-by-step.

I am really loving these tips! I am all about soaking the dishes but never knew to use cold water. Excellent – that will make it so much easier.
Such great tips! It’s embarrassing how much I shy away from a quick loaf of homemade bread (usually soda bread) because of the sticky floured countertop mess!
Great tips, Jen. I’ve never kneaded in a bowl before – will have to try it!
Love the cold water tip Jen – life got much easier when I discovered that one!
I laughed at the “lightly floured surface” comment! It does get messy, but…I can honestly say I like the mess. I just always forget to not wear black pants when baking at home!
Love the idea of kneading in a bowl. Learned a great tip from our friends at King Arthur Flour – use a disposable shower cap [cheap from the dollar store] to cover dough while rising. I hate fighting with plastic wrap, and besides, I can reuse the shower caps for my next loaf of bread!
These are some great tips! Especially about kneading in a bowl…that’s great! Thank you for sharing with us.
Great tips! That’s what I do too! I’m a very ‘clean-as-you-bake’ kind of gal. :-)
Great tips! I do admit to using my standing mixer + the bread hook. All the kneeding is done in there so my mess is easily contained!
Great tips, Jen! I’ve never tried leaving the dishes to soak in cold water before; I’ve always used warm…I’m definitely going to try that next time!
You do know I am saving all these posts for when I get the courage up to make bread again, right?
Hi Jen,
Can I use a plastic bowl to let my dough rise or do I need a ceramic one?
I really would like to try baking breads using yeast. The ones I made without are not that yummy. :(
Hi, Rita – Yes, I actually use a plastic bowl to let my dough rise pretty frequently. Hope you enjoy baking with yeast! :)
What is that fabulous mixing device and where might I find one??
Hi, Boco – It’s a dough whisk… You can purchase one from Amazon (affiliate link) or you can probably find them at a baking supply store.