 Ever since I saw the episode of Jamie Oliver’s Food Revolution where the elementary students could not identify basic fruits and vegetables (like a tomato!), I just can’t get it out of my head. This week, I was outside checking on the pumpkins growing in my backyard, I started to wonder how many children really know how pumpkin pie is made. Do they think that the pie fairy leaves the pies at a local bakery? Or perhaps that pumpkin pie comes from a frozen crust and a can of premade pie filling? The idea that children have no idea what they are eating makes me cringe, even if I don’t have kids of my own!

So, for this week’s Works for Me Wednesday post, I thought I’d share a quick tutorial on how to make pumpkin puree… From a pumpkin (as it should be)! It’s really quite simple.
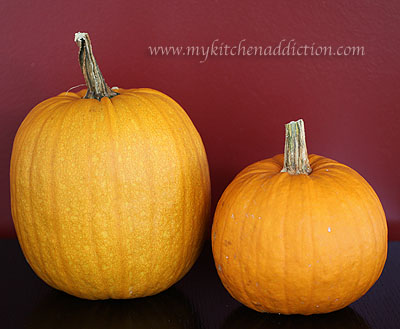
Earlier this week, I picked our first two pumpkins from the garden… It was a moment I had been looking forward to for months, since I planted the seeds at the beginning of the summer. There’s just something very satisfying about cooking and baking with ingredients from my garden!
Even if you don’t have a garden where you’ve been growing pumpkins all summer long, I definitely think it is worthwhile to try making your own pumpkin puree at least once (though it may not be practical for you on a regular basis). Save one of those pumpkins from your annual pumpkin picking trip and consider making some of your favorite pumpkin goodies with your own pumpkin puree. The flavor is amazing (much better than canned!), and you can be confident that your children will know exactly where their pumpkin pie comes from!
Pumpkin Puree
(Yield depends on the size of the pumpkins. My 2 pie pumpkins yielded approximately 5 cups.)
Preheat the oven to 375°F. Line a baking sheet with aluminum foil and set aside.
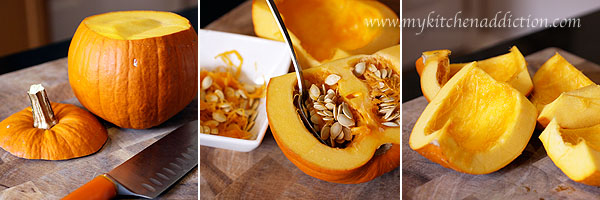
Begin by slicing the top of the pumpkin off, right below the stem. Then, cut the pumpkin in half, cutting from top to bottom. Use a spoon (or your hands… that’s what I typically end up doing) to scoop the seeds and pulp out from the inside of the pumpkin. Don’t throw the seeds away… You can roast them (I’ll post a recipe soon!). Once you’ve removed the seeds and pulp, cut each half of the pumpkin in half again so that the pumpkin is cut into quarters.
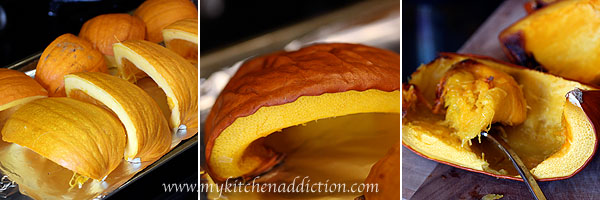
Transfer the pieces of pumpkin to the baking sheet, cut side down. Bake until the pumpkin is fork tender (for about 45 – 60 minutes). Allow the pumpkin to cool for about 10 – 15 minutes, until it is cool enough to handle. Then, use a spoon to scoop the flesh of the pumpkin out of the skin.
Transfer the flesh of the pumpkin to a food processor and puree. Refrigerate for about a week or freeze for up to 6 months. Use in any recipe where you would use canned pumpkin puree!

I do this every year…except last year! And I was so mad at myself for forgetting. Not letting that happen again this year!
I’ve never made my own… but I definitely need to!
Thanks for this awesome tutorial. I have never made my own out of fear that it was difficult but from what I see here it would not be easier.
Thanks for the awesome tutorial. I have never made my own out of fear that it was difficult but from what I see here it could not be easier.
Isn’t it so wonderful to cook from your own garden? It makes me such a happy girl! :)
Well done on growing your own pumpkins, they look perfect!
Pumpkin pie isn’t really done here in Australia, but I was determined to make some for thanksgiving when I was living in Canada. I remember finding it so difficult to sift through all the online recipes to try and find some that didn’t use canned pumpkin! Great work :)
I just looked yesterday and there’s still no canned pumpkin on the shelves, so I payed close attention to this tutorial because I think I’m going to have to be making my own this year!
thanks SO much for posting this! i’ve never made my own pumpkin puree but am seriously considering it this year as the shortage continues. it doesn’t look as difficult as i thought it would be!
Thanks for the great tutorial on pumpkin puree. I love pumpkin pie (all things pumpkin, actually- have you tried pumpkin-chocolate chip bread? Yum!) and can’t wait to use this, just in time for Canadian Thanksgiving.
I like to do this with my kids at school. Most of them have no idea where their food comes from! Thanks for the tutorial- it was perfect timing!
Thank you for this post… as I was reading it, my youngest peeked over my shoulder and asked if we could plant our own pumpkin patch. :)
Homemade pumpkin puree is awesome! What type of pumpkins did you grow? Last year I used cheese pumpkins and I have decided they are officially my favorite!
It’s been a while since I’ve done this. I usually freeze it and keep it on hand for pumpkin bread when I have unexpected visitors. Thanks for reminding me to go buy some pumpkins at the farmer’s market!
I can’t wait to go pumpkin picking so that I can do this! I’ve always wanted to try it, and hope to freeze some too. Great tutorial!
I make my own pumpkin purée all the time too – so easy and you know what you are getting!