 Lately, my husband has been getting me into a bit of trouble.
You see, he’s my taste tester. He’s not afraid to tell me when something I make is awful (it has happened before… believe me!), so I know he’ll give me an honest opinion. So, when I’m baking and working on a new recipe, I often take him a plate of samples.
A few times lately (including yesterday when I was working on this particular recipe), he has raved on Facebook about what I made for him. I’m thrilled when my recipes turn out well, and I’m always glad that he’s happy with his afternoon snack. But, I wind up with a whole group of jealous friends, neighbors, and relatives who want to know why I didn’t make homemade oreos (or cinnamon rolls, brownies, muffins… ) for them. It’s a bit of a dilemma!
In this case, the homemade oreos that my hubby was taunting his friends with on Facebook were already spoken for… Most of the cookies were destined for the cafe at our church. But, of course, I had set aside a few extras for my hubby. Then it hit me… I had a solution to my problem! I just reminded him that if anyone wanted samples of the treats, they would have to come out of his snacking stash. My guess is he won’t be sharing my baking secrets on Facebook anymore!
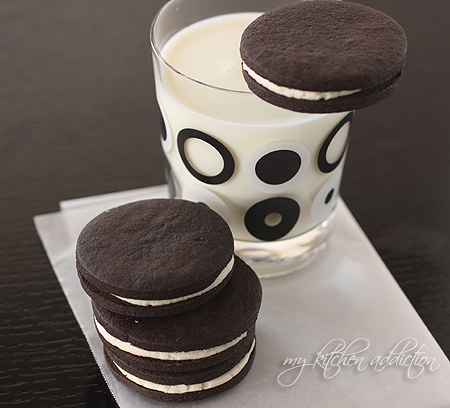
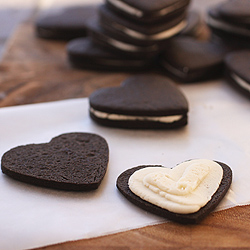
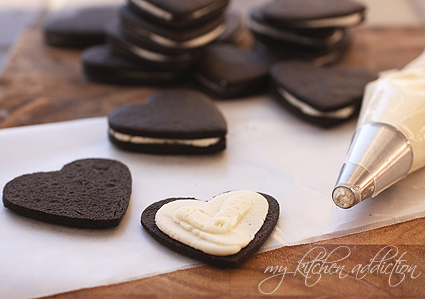
These homemade oreos are easy to make. They are based on my recipe for vanilla bean sugar cookies. By adding dutch process cocoa, they have the dark chocolatey flavor of oreos. Paired with a quick vanilla buttercream filling, I happen to think they are better than the originals. Of course, if you’re friends with my hubby on Facebook, you already knew that.
Homemade Oreos
(Makes approximately 3 dozen)
For the cookies:
- 1 cup (2 sticks) unsalted butter, softened
- 1 cup granulated sugar
- 1 egg
- 1 teaspoon pure vanilla extract
- 2 cups all purpose flour
- 3/4 cup dutch process cocoa powder
- 1 1/2 teaspoons baking powder
- 1 teaspoon salt
For the filling:
- 1/2 cup (1 stick) unsalted butter, softened
- 2 tablespoons half and half
- 1 teaspoon pure vanilla extract
- Pinch of salt
- 3 – 3 1/2 cups powdered sugar, whisked to remove any lumps
Begin by preparing the cookies. Combine the butter and sugar in a large mixing bowl, and beat on medium speed until light and fluffy. Add the egg and vanilla, and beat until well incorporated.
Meanwhile, whisk together the flour, cocoa, baking powder, and salt. Gradually add the dry mixture to the creamed mixture, beating on the lowest speed. Continue to mix on the lowest setting until the dry ingredients are just incorporated.
Divide the dough in half, and shape into two discs. Wrap in plastic wrap and refrigerate for 1 hour.
When the dough is chilled, preheat the oven to 350°F. Line a baking sheet with parchment paper or a baking mat. Set aside.
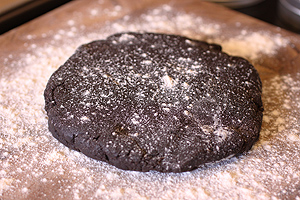

Taking only one portion of dough out of the refrigerator at a time, turn the dough out onto a lightly floured surface. Roll the dough to 1/8 – 1/4-inch thickness. Use a cookie cutter (approximately 2 inches in diameter) to cut out cookies and transfer them to the prepared baking sheet.
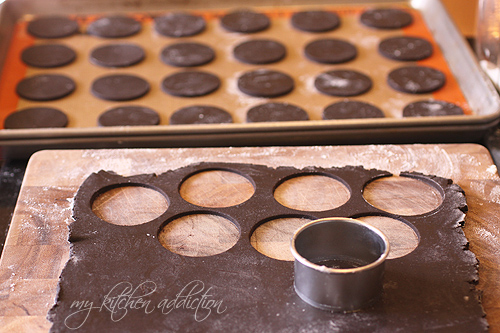
Bake the cookies for 12 minutes, then transfer to a wire rack to cool completely.
Once the cookies are cooled, prepare the filling. Combine the softened butter, half and half, vanilla, and salt and beat until combined. The mixture may be a bit lumpy, but will come together. Add the powdered sugar gradually, approximately 1/2 cup at a time, until the filling comes together. It will be slightly stiffer than a cupcake frosting.
Transfer the filling to a piping bag fitted with a large round tip. Pipe the filling onto half of the cookies, and top with the remaining cookies to form cookie sandwiches.


Wow! These were easy and turned out perfectly! Thanks for the recipe. Love the photos as well!
I made the chocolate cookie disks last night and got up this morning to make the creamy center and assemble. As an FYI, I did use 1 cup white WW flour and 1 cup AP flour. I am wondering if the cookies are supposed to me more crisp. Mine turned out kind of soft. They are tasty (at least I think so),but “they are not crispy like Oreos” as my 4 year old pointed out. Are they supposed to be crispy? If so, any ideas of what I did wrong? Thanks for the recipe! It is a great treat for kids on the Feingold Diet!!
Hi, Marianne – You are correct, the cookies aren’t quite as crisp as an Oreo. You can bake them for a little while longer if you want them to be a bit more crisp.
you can also lower/leave out the baking powder which is what causes them to rise. it’ll make the cookie denser thereby making it crisp more. i think dropping the B.powder to 1/2-1tsp plus baking a couple minutes longer should be the best combination for the proper density & crisp
You could try baking them twice. Let cookies cool after first baking, then warm oven to 200F (or 180F if oven heats intensely), put cookies back in the oven for more or less 10 minutes (it would depend how thick cookies are and how the oven heats…). Turn oven off but do not open door until several hours later, let cookies cool off in the oven! Cookies will be totally crispy because they had time to dry out!
Is it the egg? Oreos don’t have egg. I can’t have eggs so I was disappointed this recipe has an egg. And I was wondering how they could be crispy.
Hi Pam, maybe you can try to use linseed and water instead of eggs :)
like this: http://bonzaiaphrodite.com/2011/10/how-to-make-a-flax-egg-for-vegan-baking-the-right-way/
I am so putting this on my “to go” list! Wonderful!
I hope you don’t mind if I use it in the food fight feature tomorrow (photo and link back only!)
I always broil things if I want a little crisp. But, stay close by to watch your cookies closely!
These look so good! Never thought to make my own!!
Thr great thing about Oreos are that they are vegan. Your home made recipe is not! Big difference!
if by vegan you mean full of artificial crap, I see what you mean. :)
plant-based is not better if the end product is so highly processed it resembles plastic.
convert this yourself if you are convinced vegan is better … coconut cream and coconut oil etc.
I’d take real food over vegan any day. I can feel good about treats like this
sorry but what is “half & half ” please ?
Hi, Gael – Half & half is a dairy product made of half cream and half whole milk (popular in the US)… You can simply substitute either cream or whole milk in its place.
I made these the other night. I just used regular cocoa powder(don’t know if that changes anything). My cookies were a lot lighter of a brown. The icing was also super thin. I added more powdered sugar but if you add too much, it starts to taste too weird so I was hesitant. I would have never been able to put it in a piping bag, it would have been pointless by how thin it was. My icing ran everywhere after being put on the cookies and they ended up being very messy Oreos. They tasted good but I don’t think I’ll make them again. Not worth the mess.
About your frosting… you need to blend it for a full 5 minutes for it to work right. I haven’t made it, but I do cakes all the time. A stand mixer is best, but a handmixer will work. Sugar takes time to meld and not be grainy… so a 5 minute mix is what the missing item is!
I am also pretty sure the cocoa matters for the color, and maybe some of the taste.
Do you know if there is a gluten free flour substitute that would work as well as the regular flour? My son can’t have the regular flour.
Thank you!
Hi, Lisa – I have not personally made these cookies gluten-free. However, I think an all purpose gluten-free flour blend (i.e. from Bob’s Red Mill or King Arthur Flour) would likely work well. If your son is OK with nuts, you could also replace some of the flour with some almond or hazelnut flour, which would add a nice flavor and a nice texture. Let me know if you give it a try!
These look so yummy!! I can’t wait to try them! I’m putting together a list of things to make as Christmas gifts on my blog and was wondering if you’d be okay with me including a picture with a link to your article. Thanks!
I’m a little disappointed that these are made with butter and half and half, original Oreos are vegan, I’d have to play with the recipe a little to make it work.
I have read and reread this recipe and my cookie dough turned out incredibly dry and crumbly. I couldn’t get it to come together. So I added small amounts of almond milk at a time and mixed until it looked and could be formed like cookie dough. I was sure I’d read similar comments above but I haven’t. Any thoughts on why this happened? I know I used the correct measurements without question. Either way, these turned out yummy though!
Thanks
Jessica – I’m sorry the recipe didn’t work out for you. Without seeing exactly what you did, I’m not sure what happened. It could be that the flour wasn’t measured exactly (scooping with a cup versus spooning the flour into the cup and leveling off) or something else. Adding almond milk (or regular milk/cream) would be a great way to fix it, though.
HI Lauren,
I first saw your amazing stuff on We all loved it! One of my friends is not a fan of Oreo(incredible it exist) and she even liked it a lot.
HELP!!! I wanted to try your filling in my dark devil chocolate cookies, but if all the cookies dont get eaten up right away would they have to be refrigerated??? PLEASE ANSWER SOON IM IN A HUGE BIND!!!
Hi, Raven – I don’t always put the cookies in the refrigerator, but that’s up to you. I’d recommend eating them within a day or two, though.
seriously, those crying about it not being vegan needs to wake up. I’d take real, little to no processed, and as chemical free foods over vegan. It’s about being healthy and using healthier ingredients that aren’t pumped full of hormones and chemicals and other unknown things being put into your body. Thank you so much for this recipie! We love it and my kiddos prefer it over the store bought Oreos! I’ve shared this recipie with several of my friends who love it too!!
I used all organic products for this recipe including real salt (which for future, I might add a teeny bit less) with no problems… Dough was perfect, easy to tol out after refrigerated, and cook easily… these were well loved… The only people who didn’t like them were the people who preferred the chemically taste of Oreos… These are a great chocolate sandwich cookie
while real Oreos are vegan, there is so much garbage in them that it doesn’t make them better for you…
this did not work for me wish it did
These cookies are f*ing phenomenal. I thought the filling was a bit too sweet on its own, but it was perfect with the bitter cookie. They are right on the mark, I love them, and I will be making them forever. Thanks for the recipe!
I love having recipes like this so I can control the quality of the ingredients of an old time favorite. The hearts so cute too! #yum
I just made these and they are so close to the real thing!! Love the icing too!
Very good! The cookies are closer to Thin Mints texture than Oreo, but absolutely delicious!!!!
The icing is also amazing, needed the full 3.5, but it was a bit too think so I think next time is going to be around 3.25 instead….
Thank you so much for this recipe!!!!
Hello! I’m making these now and he cookie itself is so delicious!! Will the cream filling make these cookies soggy?