 Something about the holidays always gets me in a decorating mood. I love it all, from decorating the Christmas tree and the house to decorating cookies and cakes… But, as you might have guessed, I especially love the cookies and cakes!
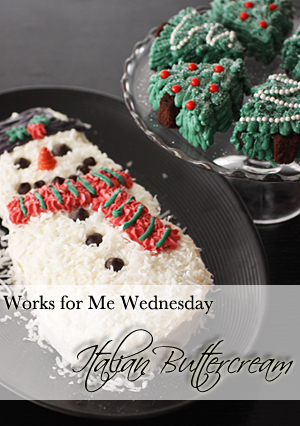
A few weeks ago, I shared my simple method and recipe for royal icing, so I know you’re covered for your holiday cookie decorating. So, to make sure you’re prepared for all of your holiday cake decorating needs, I thought I’d take a few minutes this week to show you how to make Italian buttercream.
If you’re not familiar with it, Italian buttercream is the smooth, light, and oh-so-buttery (but not quite as sweet) cousin of the powdered sugar version of buttercream that you are probably already familiar with. They’re in the same family (I believe the surname is “butter”), but they aren’t close cousins that grew up together. Nope, they’re like distant second cousins. I like to think of Italian buttercream as that sophisticated cousin who moved away to Europe to lead a far more glamourous life. You can judge for yourself, though.
The Recipe…
I’ve made Italian buttercream a few times in the past… And, I’ve followed different recipes each time. So, for this month’s Kitchen Bootcamp challenge, I thought I’d try the recipe for Italian buttercream from The Professional Chef. My experience with the book so far is that the recipes are solid… And, they are classics. So, it’s always a great place to start!
The Italian buttercream recipe made 3 pounds of buttercream, though. I certainly didn’t need to consume 3 pounds of buttercream, so I halved the recipe. (We won’t really discuss whether or not I needed to consume 1 1/2 pounds either… Though, I didn’t eat it all. Really, I didn’t.) Don’t worry, this is still plenty of buttercream to frost a batch of cupcakes or a layer cake with some left over.
Mise en place (having everything in place, measured, and ready to go before you start) is especially important with Italian buttercream. It’s really not difficult to make, but timing is important. Make sure your butter is softened, your sugar is measured, and your egg whites are already in the mixing bowl before you turn on the stove. You’ll thank me later when you’re dipping your finger in that creamy, pillowy frosting.

Italian Buttercream
Makes about 1 1/2 pounds
(From The Professional Chef)
- 1/2 pound (8 ounces) granulated sugar, divided
- 1/4 cup (2 ounces) water
- 4 egg whites
- 1 pound butter, softened and cut into chunks
- 2 teaspoons pure vanilla extract
- Gel food color (optional)
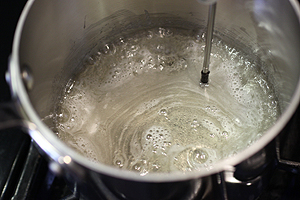
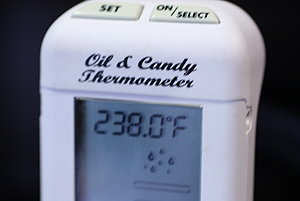
In a heavy saucepan over medium-high heat, combine 6 ounces of granulated sugar with the water. Stir the mixture only until the sugar dissolves in the water. Then, attach a candy thermometer to the saucepan, and continue to cook until the mixture reaches 238°F (which happens to be soft ball stage, if that’s the way your thermometer is labeled).
As you are heating the syrup, begin to whip the egg whites in the bowl of your stand mixer using the wire whip attachment until frothy (on medium-low speed). Once the temperature has reached about 230°F, turn the mixer up to medium speed and gradually add the remaining 2 ounces of granulated sugar. Continue beating the egg whites until they reach medium peaks (not soft, but not quite stiff either).
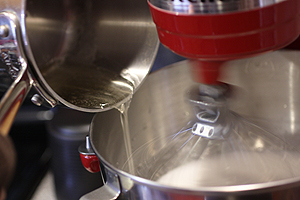
Once the sugar syrup reaches 238°F, carefully add it to the meringue in a slow stream while continuing to whip on medium speed. Turn the mixer up to high, and whip until the meringue has cooled to room temperature.
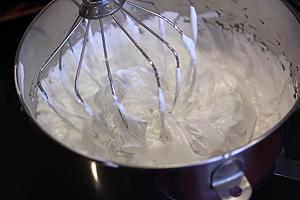
Gradually, add the softened butter in small batches, continuing to mix well after each addition. (Some people switch to a beater blade attachment at this point. I have made it both ways, and lately I usually just stick with the whisk since I find that the buttercream comes together faster that way. It does seem to introduce more air bubbles, though. Do what works for you!)
Scrape down the sides of the bowl as needed, and stir in the vanilla. Add food coloring, if desired. Use immediately or refrigerate in an airtight container. Let the buttercream come to room temperature, and re-whip, if necessary, before using.
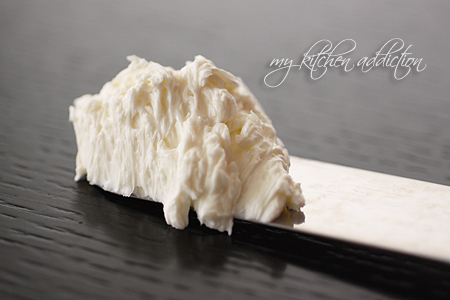
Cautionary Note – Every single time I have made Italian buttercream, there has been a point where it starts to look soupy after I add the butter. I always get nervous, but despite my worries, it always comes together in the end. Just keep whipping/beating, and it will be OK!

Chicago Metallic Giveaway!
Now that you are ready to make some lovely Italian buttercream, you need something to decorate, right?
Lucky for you, I was given the opportunity to try an assortment of holiday themed cake pans from Chicago Metallic, and I’ll also be giving a set of the pans away!
The pans are silicone, which made me a bit nervous at first, but they are reinforced with metal rims, so they are sturdy when you pick them up. So, there was no repeat of the great chocolate cupcake disaster (yes, I flipped a batch of chocolate cupcakes in a silicone pan one time… Unbaked… All over the oven.). Just spray the pan well with baking spray (the kind with some flour added works especially well), focusing on the corners and any nooks and crevices in the design. You’ll have beautifully shaped cakes just begging to be slathered with some buttercream!
Interested in knowing more about Chicago Metallic? Be sure to follow them on Twitter and check out their Facebook page for lots of great information!
Giveaway Details…
Ready to do some baking? Chicago Metallic has provided three great pans for me to give away to a lucky winner…
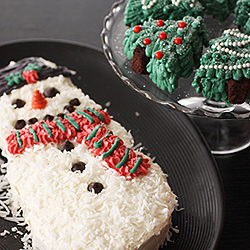
- Christmas Tree Cakelet Pan – Makes 8 small tree-shaped cakelets
- Large Snowman Cake Pan – Makes 1 large snowman cake
- Turkey Cakelet Pan – Makes 8 small turkey-shaped cakelets
Congratulations to Jeanine Feldkamp who was randomly selected as the winner of the three cake pans!
Decorating Inspiration…
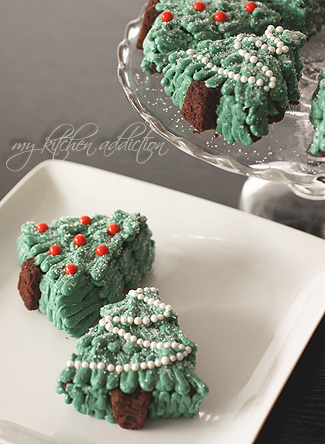
Looking for some decorating inspiration? Here are the step-by-step photos for decorating Christmas tree cakes. Even if you don’t have the cakelet pan, you can bake a large sheet cake and use cookie cutters to cut out mini tree-shaped cakes!
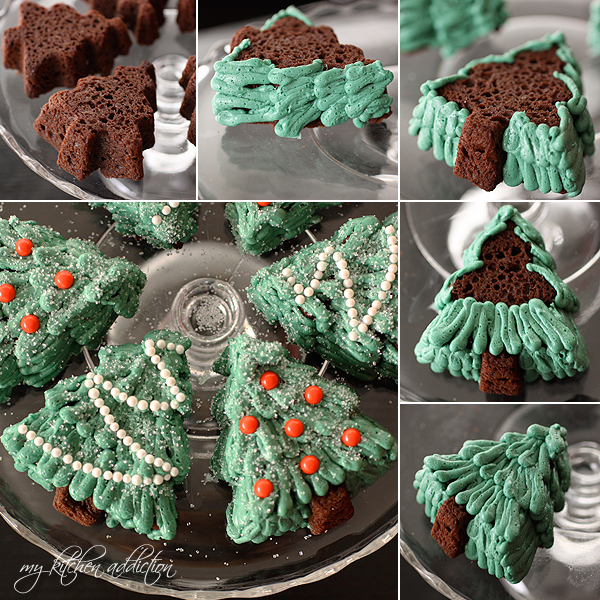
- Use a medium round pastry tip (#4 is what I used) to pipe a zig-zag of branches along the bottom and sides of the tree, working from the bottom up.
- Cover the front of the tree with rows of zig-zags, starting from the bottom. Allow each new layer to overlap the previous layer slightly.
- Sprinkle with white sanding sugar to add snow, and decorate with candies.
Happy decorating!
My Kitchen Addiction Disclosure– The giveaway items (a set of three cake pans from Chicago Metallic) have been provided at no cost to me and will be shipped from Chicago Metallic. I also received samples of the cake pans for the purpose of reviewing them. I have not been otherwise compensated for this post or for reviewing the product. As always, all opinions expressed are my own.
Please Note – The links to the Professional Chef provided in this post are Amazon affiliate links.

I really want the 6 cup giant muffin pan! Love.
I think chocolate cake would be just beautiful in the pans :)
I tweeted. Keeping my fingers (and toes) crossed!!
how CUTE are those little cake pans!? ugh love ’em. I’d probably make a pumpkin spice cake mMm i bet it’d be fab w/ that italian buttercream!
that xmas tree pan is definitely at the top of my list! perfect for bringing goodies to parties :)