
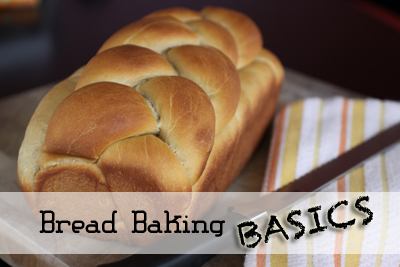
 This week, I thought I’d kick off a mini-series on the basics of baking homemade bread. I get a lot of questions and comments about bread baking, and I’ve noticed a theme… A lot of people are intimidated by it!
I totally understand that. Until a year or two ago, I was also pretty intimidated by baking bread. My mom has always been great at it, but I had never really caught on to it. In my healthy eating efforts, though, I started to realize that baking my own bread was a great way to cut costs and keep an eye on the ingredients. So, I began to learn how to make my own bread, and now it’s something that I love and do regularly.
I find that baking bread is a relaxing and enjoyable process, and I want to share that with all of you. So, over the next few weeks, I’ll be going over some of the basics to help you to learn to bake beautiful homemade bread without all of the drama! I’ll show you what has worked for me… It’s easy, I promise!

Week 1 – Equipment
Like most kitchen endeavors, having the right tools for the job can really make or break your bread baking experience. You’ll be happy to know, though, that I’m not much of a gadget person, and I’m not going to tell you to go spend your life savings on a bread machine or other fancy kitchen gadgets that are only good for one thing. I’m a big fan of Alton Brown, and I agree wholeheartedly with his position on “uni-taskers” in the kitchen.
So, without further ado, here are the basics that you’ll need to make your own homemade bread…
Measuring Cups and Spoons
These are pretty much a given when it comes to baking, but I thought I’d throw them in there, just in case… Any standard set of measuring cups and spoons will do. Just make sure you also have a liquid measuring cup!
Large Mixing Bowl(s)
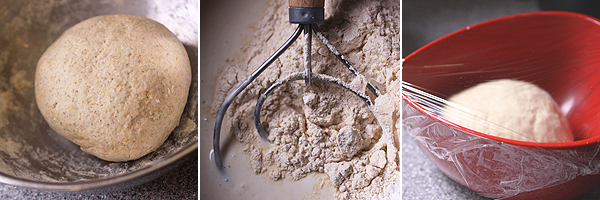
First things first… You need something to mix up your bread dough in. Simple enough, right? I typically use my large stainless steel mixing bowl, but glass, ceramic, or even plastic will be fine. This is one place where size definitely matters. You want a bowl that’s large enough to not only contain your ingredients but allow you to get your hands in there and knead the bread. (We’ll talk more about that soon…)
In theory, when it comes to letting your bread rise, you could use the same mixing bowl that we just discussed above… But, I don’t really recommend it. You’d have to wash it in between mixing and rising, which I think is a pain and will make more of a mess than it’s worth. If you’ve seen any of my bread recipes, you’ve most likely noticed that I like to let my bread rise in a red heart shaped plastic bowl. Again, any bowl will do, but size does matter.
Wooden Spoon or Dough Whisk
I used a wooden spoon to mix up my bread dough for a long time, and any large, sturdy wooden spoon will do. But, last fall I discovered the dough whisk, and I have really grown to love it. It is nice and sturdy and is perfect for really working the flour into the dough.
Plastic Wrap or a Damp Towel
Your dough will need to be covered while it is rising… Otherwise, it will dry out. Simple enough, right? You can either use plastic wrap or a damp towel. I typically use plastic wrap because it cuts down on how many kitchen towels I have to wash in a week.
Baking Sheets and Bread Pans
Finally, you’ll need something to bake your bread in (or on). There are lots of different loaf pans out there, and you can choose whichever you like best. It’s always good to have a traditional 9-inch loaf pan. If you want to get fancy, you can also buy a pan designed for making baguettes. Just be sure to pick a sturdy, heavy pan that will heat evenly. If you’re baking rolls, you can bake them on a standard baking sheet… I’d just recommend lining it with parchment paper or a silpat liner (which I absolutely love).
Next Week… Yeast!
Yeast is a key ingredient in bread baking, so next week we’ll tackle the different kinds of yeast and how to use them. Don’t get scared, it’s really not that bad.
Please Note – The product links included in this post are Amazon affiliate links.

Ooo, I am intrigued by that dough whisk! I don’t think I’ve ever seen one before.
Great idea for a series, Jen!
Jen, if you can take the drama out of bread making for me I would be over the moon.
this is what i really need to get me going on making my own bread! Thank you~
Oh how I LOVE my King Arthur dough whisk! It makes mixing the dough so much easier than a spoon. I started baking bread several years ago because it made me feel closer to my grandmother who had passed away & she made fresh yeast rolls daily for as long as she was able. Many of my friends are in awe of the bread I make but I try to reassure them that it really isn’t difficult. You just have to be patient & give the yeast time to “do its thing”! Love your blog!
What a great series, I’m looking forward to the next part! I’m intrigued by the dough whisk, and will likely get one now :)
Had to laugh to myself when I read this….just had a bread machine delivered today! I had ordered the bread machine because of the intimidation factor. (Glad to hear there was such a thing! LOL) I am still going to read your blog and try to do it myself! Thanks for taking the time and breaking it down.
So excited to see this! My dad made his own bread for eons for the same reason you are. He was ahead if his time : )
Also no fancy gadgets for him. I hope when I try this I’ll succeed!
Thank you!!
Thank goodness. I need all the help I can get in the bread department!
xo
m
Great tips!! I am bookmarking this page!
So excited about your series! And I can’t wait to learn how to make the loaf in your photo; it looks gorgeous!
I love those beautiful dough whisks, I know you don’t technically need one, but I like ’em.
I’m loving that dough whisk! This is a great post. It has taken me a while to get comfortable making bread. I wish I’d had you beside me all this time!
I cannot wait to see more of this series…I am always so intimidated by bread!
It’s a series just for ME! I *will* conquer bread this summer!
Mardi is mistaken, it’s a series just for me! Or maybe just for “us”. whatever the case, I’m defintely looking forward to it!
What a great start! Question, I keep hearing the temperature of liquids and ingredients is so important, so is it essential to invest in a kitchen thermometer?
Great question, L.S. I personally own a kitchen thermometer, but I rarely use it when I’m baking bread. I go by the rule that the liquids should feel slightly warm to the touch, but not hot. That has always worked for me. If you’re not sure, go a bit on the cool side (or more lukewarm/room temperature)… Your dough may rise a bit more slowly, but you won’t risk killing the yeast.